Showing posts with label Kid Crafts. Show all posts

Monday, April 18, 2011

Easter Bunny Placecards and Banner

On the weekend I made some Easter Bunny Placecards...


I just used some heavy card-stock scrap paper and cotton balls
(and some yarn for bunny necklaces.)


Glue a cotton ball close to the base of the bunny so that it can support the weight of the cardstock.
Mine cooperated, but they do fall over pretty easily so I made a little support
(pic on left) 
It is just a strip of card stock taped on along the base for the bunny to lean on.  
If you add the support, just place the cotton ball around it, to hide it.


Here's what they look like from the back...


View from back and front
(I made little yarn necklaces and cut out a flower from cardstock scrap.)


I will probably personalize them later, by adding names across the bottom


They were so cute, I made more to hang as an Easter banner in the window.


update:  linking here


xox
Mel

Monday, April 11, 2011

Painting with Bob The Builder

My little guy loves Bob the Builder and is always playing with his "Bob and the team" toys.  He either spends hours playing with all the vehicles (especially in the dirt outside) or he dons his Bob toolbelt and destroys fixes the house for me... such a helpful little chap ;)

So I thought he would really enjoy painting with Dizzy, Muck, Scoop and Rolly

The great thing about this project is that it uses supplies on hand:

*Paper (I have a jumbo roll which I am always using for kid related fun)
*Paint
*Apron
*Paper Plates
*Bob the Builder's Team

(I just used paint colors I had on hand, but if I had had yellow and green paint, I would have co-ordinated the paint with the vehicles.)


He really had a lot of fun with this, but I think the funnest part was cleaning up...
(which is always a good thing for us mothers)


Surprisingly, this project did not make a lot of mess...maybe due to the large roll of paper...we will definitely do this again.


update:  linking here

Wednesday, April 6, 2011

Easter chick cookies

Inspired by the very talented Maki Ogawa's cute little chick cookies, I decided to make my own version, and we all know how that goes....

While searching for a ball shaped cookie recipe, I found a recipe for Snowball Cookies at The Baker Who Cooks and thought the kids would love the surprise of the chocolate inside.  However, I wanted to make mini-cookies, so I exchanged the Hershey Kiss for butterscotch chips.
(I also made some non-chick cookies with white and milk chocolate chips inside).
 
Some notes on the process:
* As I was rolling the dough into balls, I realized that I could use the pointed end of the butterscotch chip as the chicks beak.

* For the eyes, I melted some semi-sweet chocolate chips in a bowl, and used a ziplock bag as a pastry bag to dot on the eyes...not the greatest method, but it worked okay.

* To make the nest, I just used the left over melted chocolate to scribble onto the plate in a nest shape.  I then put it in the freezer for a half hour or so to harden.  Very easy!

* Maki used chocolate pens to decorate the eyes and beaks...but I had never heard of such a thing...so I looked on Amazon and found this cool product - Cuisipro Food Decorating Pen,  which looked like it could be very useful.

*  The cookie recipe calls for nuts, which I didn't have, so I just omitted them. (I don't get too hung up on the details when baking, but luckily it worked out this time.) 

* The recipe also does not use eggs, which makes it a good one to remember late at night when you have a sudden craving for something sweet but don't have any eggs...and let's be honest, how often does a lack of eggs in the house thwart all plans of making a decadent midnight treat.

The kids loved the little chicks, and devoured the entire batch in about an hour.  I think it was partly because I obviously wasn't monitoring them too closely and partly because the cookies were so small it made them very more-ish and hard to keep track of how many you had actually eaten.  
Oh well, that just means no cookies for me for breakfast tomorrow ;)


Below is the step-by-step process:
1. Divide up the cookie dough
2. Roll into ball shape
3. Push butterscotch chip into the center
4. Roll the dough around the chip
5. Make sure the top end of the chip sticks out slightly to form the beak


I made some plain ones, too, with chocolate chips and white chocolate chips


update: linking here

Monday, March 28, 2011

Lego Ski Resort Fun

Like most kids, my children are crazy about Lego, and like most homes across the country, there is Lego lurking in every nook and cranny of my house.  I try to designate specific areas of the house to Lego playing, but I guess it is just not part of the nature of Lego for it to be confined to a specific space (or I guess, neither is it part of the nature of children to be confined to a specific space in the house!) ...and so Lego has just become part of the decor in our house.  And to be quite honest, I don't know what I will do with myself when part of the vacuuming experience doesn't involve emptying out the canister and fishing out tens of the tiniest pieces of Lego.   But it is all worth it when you see how Lego sparks their imaginations and that the kids can spend hours totally immersed in putting together new and different creations.

Last weekend they had grand visions of transforming our living room into a ski resort, with Lego Ski Guys and chair lifts and gondolas strung across the living room.  When their vision included large sheets of cardboard and vast paper backgrounds,  I we decided that it would be a much better idea to make the ski resort in their bedroom, where they could make their resort as large as they wanted to, and could keep it up as long as they wanted.  And it is always a bonus when one can enter the living room without unsuspectingly being half decapitated by barely visible string hanging from wall to wall to wall!


It was a very easy project - all you need is:
Cardboard
Tape
Large roll of paper
Paint
String

We had all the supplies on hand, except for cardboard, which required a quick trip to the recycle center.   We cut the cardboard into two ski runs and covered them in the paper - since ski runs are white, that was all that needed to be done.  Except, of course both ski runs had to have ski jumps, which were playmobile bike ramps that the kids taped on.

Then we rolled out the paper and painted a mountain landscape for the background.  We taped this to the shelving in the kid's bedroom and left a little shelf space for the catwalk!  Lastly, we hung the string across the mountain peak background for the gondola  and chair lifts to move along.

The kids spent hours making the gondola and chair lifts and putting together the skiers and snowboarders, which is always a good thing for a mother of four :)


update: Linking up here

Sunday, March 27, 2011

Make Your Own Lego Mini-Figures

A little while ago AshleyAnn did a post about making lego mini figures with her kids... and since my boys are equally as lego-obsessed, I thought that they would love to do this too.

The boys had so much fun deciding on what characters to make.  However, we used modeling clay instead of salt dough, and I just assumed that all modeling clay hardenend, but apparently we had the non-hardening kind, and so ours never hardened completely.  Next time we will try modeling clay that hardens, but the softer counterparts have held up remarkably well.

Anyway, this is a great project to have in your back pocket for a rainy day.

All you need is:
Salt dough
Lego Mini-figure tray
Sharpie (to draw faces and details)


Thursday, March 24, 2011

Felt Flower Headband Tutorial

After having a house full of boys,  I am having so much fun having a little daughter to share my girlygirl-ness with.  My little baby girl has been unwittingly immersed into a world of pink, pink, pink.  I am constantly dressing her in pink girly outfits and there is absolutely no mistaking that this baby is a girl...

And if all this pink isn't enough to clearly identify my child as female, then these pink headbands ought to do the trick!

For the dark pink headband, I followed this tutorial here but as I was hotglueing it all together, mine got a bit out of hand and I ended up with this instead. I do still want to go back at some point and try to get the same effect as icandy's very cute one.


The light pink headband was very simple and only required a hot gluegun, needle and thread, and some felt. I had a pearl bead in my craft drawer which I sewed on at the end.


1. Cut out your small petals (9) and large petals (9) - my diagram has a different amount for both, but I ended up using 9 each!
2. Pinch the ends, and then hot glue together as shown.
3. Cut out a small circle of felt (not shown) to use as a base to hot glue the large petals together in a circle. Hot glue the smaller petals together (not on a circular base, though).
4. Hot glue the smaller petals (now one piece) onto the larger petals (which are also now one piece).

Lastly, either hot glue or sew the flower onto an alligator clip or a headband.
The whole project took me less than 10 minutes!


She didn't mind having her photo taken with the first headband, but was totally over it when I tried to put the second one on!!!
The color of the second flower is a bright pink, but it looks red in this picture for some reason.

Monday, March 21, 2011

St. Paddy's Day fun

I know St. Patrick's Day has come and gone...but here are some photos of the carrying ons that occured at our house, as we celebrated all things green...

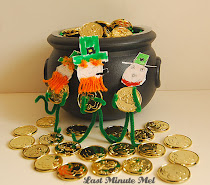
Firstly, the kids set out an elaborate trap to try and catch a Leprechaun...it involved a shoe box balancing precariously on the laundry basket, some green beads, and some gold coins strategically placed at the bottom of a black pot that was covered in shrink wrap, except for a tiny hole in the middle. The idea was for the Leprechaun to jump into the pot to retrieve the gold coins and then be trapped by the shrink wrap and fallen shoe box...
Unfortunately, the Leprechaun who visited our house during the stealth of night, was able to retrieve the gold, and escape, but he did leave some green gum and candy behind, which pleased the kids immensely, and the kids were delighted to discover that he left behind a green felt boot at the bottom of the pot!  This led to much discussion about the mystery life of the Leprechauns!


The Leprechaun also left behind a little coloring-in book which had interesting facts about St. Patrick's Day, a map of Ireland, Leprechaun jokes, mazes, word search puzzles etc.  I figured that this would be a good way for the kids to learn a bit about Ireland. 
(To make this, I printed off some free printables I found online at dtlk.com and familyfun and kaboose, and made a little booklet by stapling the pages together and then "binding" the book by gluing on a strip of green card stock.)


We made rainbow cupcakes...


For lunch we had Leprechaun sandwiches (inspired by familyfun magazine) accompanied by green jello, green grapes, green fruit roll and tic tacs...


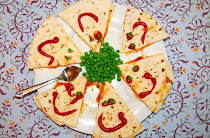
For dinner, I wanted to make a traditional Irish meal to make the day more meaningful and somewhat educational. I was going to make a lamb stew, but wasn't sure where I would find lamb, and I didn't think that corned beef and cabbage would be a hit...so we ended up going with Shepherd's pie, which I think is more English than Irish... but the kids loved it because I made individual pots and the kids will eat pretty much anything if it is served in an individual serving sized pot.  I tried to cut a spinach leaf into a shamrock shape for a garnish, but my shamrock shape cutting skills clearly leave a lot to be desired. 

I also made Irish Soda bread, which was a huge hit.  I probably shouldn't have added the raisins, since the bread was being served with dinner, but the raisins actually went surprisingly well with the meal. 

For dessert, we had Irish Apple Cake, which was also a hit, although when I told an Irish friend that I had made an Irish Apple Cake for dessert, she said she had never heard of it...so not too sure how authentic the dessert was, but it was well received and we served it with mint chocolate chip ice-cream (because its green!).

The kids got to drink green cool-aid (lemonade cool-aid with green coloring)...the Leprechauns had cheekily turned our water jug in the fridge into green cool-aid.


We also wore green hats and the boys wore orange beards (found here) and we made some orange pigtails for our little lass.

All in all we had a fun day filled with all things green and I must say, for someone who is very challenged in the cooking department, I did have fun researching and making some traditional Irish fare.  Hope you had a wonderful St. Paddy's Day and may the luck of the Irish stay with you all year long :)

Tuesday, March 8, 2011

St. Patrick's Day Craft - Pipe Cleaner LEPRECHAUNS

These cute St. Patrick's Day Pipe Cleaner Leprechauns were inspired from this article.  This craft is quick, easy and mess free (that is, if your kids don't end up drawing on your dining room craft table ;)

All you need is:
Green Pipe Cleaners
Orange Wool (optional)
Card stock
Markers
Scissors
Tape

Assemble as shown:


Be careful though, the Leprechauns will try to steal your gold...


And if you have a pot of gold lying around, they will jump in and party...
... grab your gold...
...and run for the hills...
At least that is what our's tried to do...


Click here for Linky Parties
Related Posts Plugin for WordPress, Blogger...